

The Quickbooks POS Connectivity Tool is an online utility that helps users fix several issues that trigger when working with the QuickBooks application or when connecting with the server. This tool also allows accepting payments using credit cards or managing inventory etc. It is used with QuickBooks Point to identify connectivity errors. As a result, it helps in preventing further serious QuickBooks Errors hampering the working process. AccountsPro guided earlier about the QuickBooks POS Network Diagnostic Tool. Now will walk through the guide about the QuickBooks POS connectivity tool and its usage to fix the error methods.
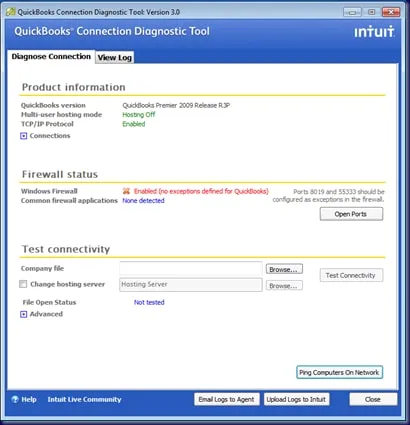
Table of Contents
- 1 Why Use Connectivity Tool in QuickBooks Desktop POS?
- 2 Types of Issues Can QuickBooks POS Connectivity Tool Fix
- 3 Where To Download the Connectivity Tool QB Point Of Sale?
- 4 Frequently Asked Questions
- 4.1 What If I Need To View A Log Of The Database In The QuickBooks Point Of Sale Tool?
- 4.2 What If I Am Not Satisfied With The Error Report In The QuickBooks Point Of Sale Connectivity Tool?
- 4.3 How Would I Configure The Firewall Configurations In QuickBooks Point Of Sale?
- 4.4 How can I add a Windows user With Administrator Rights?
Why Use Connectivity Tool in QuickBooks Desktop POS?
What are the advantages of the QuickBooks POS connectivity tool?
The QuickBooks point of sale provides a wide range of tools and options to make the business process simple for its users. The QuickBooks POS utility is designed to smooth the inventory management and retail business. It is used to diagnose connectivity errors in the QuickBooks point of sale.
Whenever you are clueless about QuickBooks POS Unexpected Error on workstation machines lets try QBPOS for troubleshooting.
Types of Issues Can QuickBooks POS Connectivity Tool Fix
What types of issues can you resolve with the QuickBooks POS connectivity tool?
Here is the list of situations you can use the QuickBooks POS connectivity utility to fix the errors:
- The errors trigger when linking the QuickBooks Point of Sale client to the server
- The POS Warning 180063: Failing to start the database service is an imprecise condition that can be fixed by using the QuickBooks point of sale connectivity utility.
- Unable to run the QuickBooks Database Manager service is an important utility to link the QuickBooks application to the server.
- Sometimes, it can be the Internet security settings or Firewall settings preventing QuickBooks point of sale because of the security factors
- Network connectivity errors or even QuickBooks Server Connection Error
- Corrupted or not running QuickBooks database manager service
- Third-party firewall restrictions
- The Point of Sale Warning 180063: failed to start the database service
While you are going for QuickBooks POS Network Setup or even QuickBooks Server Workstation Setup , QB Connectivity tool is very helpful.
Where To Download the Connectivity Tool QB Point Of Sale?
Users can easily download the connectivity utility for QB point of sale using the Intuit website. Now click on the Run button to fix the issues. The below-mentioned are the instructions to perform the download process effectively:
Restart QuickBooks POS:
The following steps are used to restart the QuickBooks Point of Sale:
- Open the Run window using the “Windows +R” button altogether
- Enter services.msc and then press the key named “Enter”
- Locate the QBPOS database Manager tab and then right-click on it
- Hit the Restart button
- Make a company file copy:
- Open File Explorer using the Windows +E keys
- Locate the C drive and then follow the below path:
- Click Users, choose Public, select Documents, click on Intuit then hit QuickBooks Point of Sale
- Locate the Data folder, then right-click on it
- Hit the Copy tab
- Now paste the file on the QuickBooks Desktop using the shortcut “Ctrl+v” keys together
Downloading steps for QuickBooks POS connectivity tool:
- Locate the Intuit website to start the downloading process of the QuickBooks Desktop Point of Sale connectivity tool
- Now save the downloaded file to a particular location.
- The path of the downloaded folder for the different variants is below:
- 32-bit users: C:\Program File\Intuit\QuickBooks POS (version)
- 64-bit users: C:\Prorgram Files (x86)\Intuit\QuickBooks POS (version)
- Next, click on the file once the downloads
- Now hit the Run button
- This tool is all set to download on the computer Desktop and also be used to fix and rectify the QuickBooks errors related to the Point-of-sale connectivity
How to Use the QuickBooks Point of Sale Connectivity Tool?
The QuickBooks Tool is used to display the data about the system. Here is the list of options available to use the QuickBooks point of sale tool:
QB POS Install Type:
If the tool has been running on the primary installation, then it should display the “Server Workstation”. In this case, you would be required to reinstallation of QuickBooks Point of Sale. If you are using QuickBooks POS 18.0 instead of 22.0, then it will appear in red, indicating that the tool failed to discover the installation folder.
QuickBooks Point of Sale DB Service status:
The status appears below QBPOS DB service should be Running. If it fails to display the running status, then close all the active programs on the system & reboot the system. Next, run the tool to ensure it displays a “Running” status.
Turn on the IP/TCP protocol:
The TCP/IP protocol status should display “Enabled”. If it is failed to display then below are the instructions to fix it:
- Hit the Start option
- It will display the Control Panel of the system
- Locate the Network & Sharing Center button, then hit the Manage Network connection button
- Search for the “Enable Local Area Connection” option, then right-click on it
- Choose the option named Properties
- Locate the button named Networking on the new page and then mark ‘TCP/IPv6’ & ‘TCP/IPv4 as selected.
- If they were checked already, then unselect them and then select them again
- Hit OK tab
Windows Firewall status:
The result should display “Needed QB POS Application exception defined in Windows Firewall.” In case there appears a green color then no worries. However, if it displays in red color, then it specifies there is a need for firewall configuration.
3rd Party Firewall Status:
If the status displays the “Detected” button, you should check that the third-party firewall is not configured properly to block QuickBooks’ Point of sale. This utility detects only the general firewalls. You should ensure that any firewall installed on the system does not interfere with QuickBooks’ Point of Sale.
QuickBooks Point of Sale Database info:
In case the Startup status tab displays Started, then it is all set. If there does not appear anything then you require clicking on the option named Look up error messages to fix the error.
In the End!
Hopefully, the write-up helps fix the QuickBooks POS Connectivity Tool. In case of any other assistance, get connected with professionals. Use a live chat, phone number, or email address to reach the technicians at QuickBooks Support Number.
Frequently Asked Questions
What If I Need To View A Log Of The Database In The QuickBooks Point Of Sale Tool?
Click on the “View Complete Database log” option, which acts as a technical log sheet showing the activities related to the Point of sale.
What If I Am Not Satisfied With The Error Report In The QuickBooks Point Of Sale Connectivity Tool?
Use the verify again tab to run the tool to fix the errors and issue a new fresh report.
How Would I Configure The Firewall Configurations In QuickBooks Point Of Sale?
1. Open the Run Window
2. Enter Control and then hit the OK tab
3. Locate the Windows Firewall tab on the Control panel page
4. Hit the Advanced Settings tab and then select Inbound
5. For Windows firewall Advanced settings, you need to click on the option named New Rule
6. Click the Port button
7. Hit the Next option
8. Enter the port numbers 80, 8040, 443, 46225, 2638, and 46228
9. Choose the Next button
10. Allot the new rule name
11. Hit the Button named Finish
12. Now generate the outbound rule with a similar procedure
13. Use the outbound rule port numbers
How can I add a Windows user With Administrator Rights?
1. Click the Start option
2. Choose the All Programs button
3. Open the Windows Small Business server option
4. Click the Windows SBS console button
5. Choose Users & Groups
6. Click the option named Add a new user account
7. Enter the user info
8. Next, embed a new user account page
9. Provide the new user administrator rights
10. Hit the Finish button
