QuickBooks Error 6000 80 is a common error that occurs when the software cannot open a company file. The error can happen for several reasons, such as a corrupted company file, insufficient disk space, conflicting software, or hardware issues. Resolving the error may involve troubleshooting network settings, ensuring proper file permissions, or repairing the company file using QuickBooks File Doctor or other relevant tools provided by Intuit.
| Error Message | QuickBooks Error 6000 80 |
| Error Name | Error 6000 80 |
| Description | “Error 6000, 80: This is a QuickBooks data file error that occurs when the software cannot open a company file.” |
| Developer | Intuit Inc. |
| Software | QuickBooks Desktop |
| Applies to | Windows XP, Vista, 10, 11 |
Table of Contents
What causes QuickBooks error 6000 80 to occur?
QuickBooks error 6000 80 occurs when there is a problem with the file header or file structure of the QuickBooks company file. This can be caused by a variety of factors, including:
- Corrupted Company File: If the company file is corrupted, it can cause problems with its header or structure. This can happen if the file is accidentally deleted or damaged, or if there is a power outage while the file is open.
- Insufficient Disk Space: QuickBooks requires a minimum of 1 GB of free disk space to open a company file. If there is not enough disk space, the file may not be able to open, and the QuickBooks error 6000 80 may appear.
- Multi-User Access: When multiple users try to access the company file simultaneously, this can lead to clashes and result in errors -6000 -80.
- Insufficient Permissions: Insufficient user permissions or restricted access to the company file may prevent QuickBooks from opening it, causing this error.
- Conflicting Software: Some software programs can conflict with QuickBooks and cause errors. If you have any software programs that you don’t use often, you can disable them to see if that resolves the error.
- File Location: Putting the company file in an improper location, such as a removable drive or a network folder with restrictive permissions, can cause this error.
- Data Conversion: This error can occur when you try to restore a backup file from an older version of QuickBooks to a newer version.
- Security Software Interference: Antivirus or security software can sometimes mistakenly identify QuickBooks files as a threat and block access to them, generating an error.
- Incomplete Installation or Update: This error can occur if the QuickBooks software is not installed accurately or the update process is interrupted.
- Hardware problems: If you have recently added or changed any hardware, such as a new hard drive or memory, you may need to update your QuickBooks drivers. You can download the latest drivers from the QuickBooks website.
Quick Tips to Fix QuickBooks Error 6000 80
- Check your disk space: QuickBooks requires a minimum of 1 GB of free disk space to open a company file. If you have less than 1 GB of free disk space, you will need to free up some space before you can open your company file.
- Run a QuickBooks file repair: The QuickBooks File Doctor can help to repair corrupted company files. To run a file repair, open the QuickBooks Tool Hub and select “File Problems.” Then, select “QuickBooks File Doctor” and follow the instructions.
- Disable conflicting software: Some software programs can conflict with QuickBooks and cause errors. If you have any software programs that you don’t use often, you can disable them to see if that resolves the error.
- Check your hardware: If you have recently added or changed any hardware, such as a new hard drive or memory, you may need to update your QuickBooks drivers. You can download the latest drivers from the QuickBooks website.
On the QuickBooks Enterprise version, there is some multiuser issue in the QuickBooks Error 6000 80, So before touching anything you have to contact the QuickBooks Enterprise Support number.
Common Solutions of QuickBooks Error 6000 80
If you receive this error, you will need to troubleshoot the cause of the problem before you can open your company file. Here are some steps you can take to troubleshoot QuickBooks Error 6000 80:
Scenario 1: When you face the error double clicking on the company file icon
- If you face this error in this scenario, go to (-6000, -80) when you double-click a company file.
Scenario 2: Update your workstations and your server to a fresh release
- Even after the latest release update, the error continues to follow the next step.
- Visit the update to the latest release page
Scenario 3: Use the tool – QuickBooks Desktop File Doctor
- Download, install, and run the QuickBooks Desktop File Doctor.
- QuickBooks Desktop File Doctor will indicate if there is no problem, try the next step.
Scenario 4: Copy the file to the local C drive.
- Copy the backup file (.QBB file extension) or the company file (.QBW file extension) to your local hard drive.
- Fix the backup or update the company file.
- Copy the restored or updated company file back to its previous location.
Scenario 5: Manually Resolve QuickBooks Error 6000 80
- Configure QuickBooks Desktop files for firewall or security software
- Check permissions to access the company file
- Scan the company files
- Verify hosting on your computers
- Open the company file and check for damage from a different location
Latest Steps to Fix QuickBooks Error 6000 80
Below are some solution steps to fix QuickBooks Error 6000 80. To know more about troubleshooting QuickBooks error 6000 80, Let’s take a look at troubleshooting in brief as well as in image view.
Condition 1: For Single-user Conditions Only
If you are using single-user mode, then the solutions for you might differ from the below-mentioned ones. The names of the solutions might seem to be similar, but the steps generally differ in both the user’s modes. So, make sure to carry out the solutions listed below:
Step 1: Use the QuickBooks Company File Diagnostic Tool
- Follow the link and download QuickBooks Tool Hub.
- Go to the downloads folder and run the Tool Hub program installer file.
- Run the QuickBooks install diagnostic Tool.
- On the left, select the Company File Issues tab.
- If the QuickBooks Company File Diagnostic Tool detects damage but doesn’t repair it, you have two options:
- Create a backup of the QuickBooks company file and then restore it.
- Use Auto Data Recovery and restore all the data.
- You can share your data with Intuit’s Data Recovery team and request them to recover it. Or you can get in touch with our certified ProAdvisors for QuickBooks support.
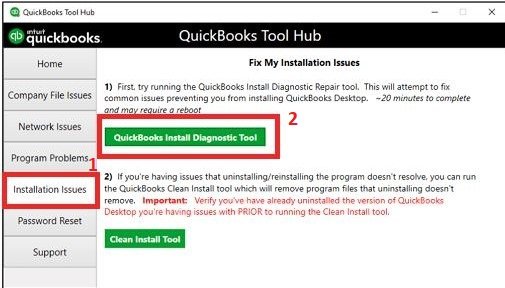
Here is a more detailed explanation of each step:
- The Tool Hub program installer file is a small program that will install the QuickBooks File Doctor and the Auto Data Recovery tools.
- The QuickBooks Install Diagnostic Tool is a tool that scans your QuickBooks company file for any damage.
- The Company File Issues tab lists any problems that the QuickBooks install diagnostic Tool found with your company file.
- If the QuickBooks install diagnostic Tool found damage but couldn’t repair it, you have two options for recovering your data.
- Create a backup of the QuickBooks company file and then restore it. This is the safest option, but it will only restore the data that was in the backup.
- Use the Auto Data Recovery tool to restore all the data. This is a riskier option, but it may be able to recover more data.
- If you’re unable to recover your data using the above methods, you can contact Intuit’s Data Recovery team or a certified QuickBooks ProAdvisor for help.
Step 2: Restoring and Updating the Company File from Local Storage
- If your company file is stored on the cloud or another computer in the network, copy the file to your computer’s local storage.
- Open the company file from your computer’s local storage.
- If you are trying to restore the backup of QuickBooks data from your online storage or the network, copy the backup file from those locations to your desktop.
- Open QuickBooks and go to File > Open or Restore Company.
- Select Restore Backup and click Next.
- Browse to the backup file on your desktop and click OK.
- Follow the instructions to restore the backup file.
Here are some additional details about each step:
- If your company file is stored in a remote location, you will need to copy it to your computer’s local storage before you can restore it. You can do this by using a file transfer protocol (FTP) client or by connecting to the remote computer using a remote desktop connection.
- Once you have copied the company file to your computer’s local storage, you can open it by double-clicking on it. If you are prompted to restore the file, click Yes.
- If you are restoring the backup of QuickBooks data from your online storage or the network, you will need to copy the backup file to your desktop first. You can do this by downloading the file from your online storage provider or by copying it from the network.
- Once you have copied the backup file to your desktop, you can restore it by following the steps above.
- When you restore a backup file, QuickBooks will overwrite the existing company file with the data from the backup file. This means that any changes that you have made to the company file since the backup was created will be lost.
- If you are restoring a backup file that was created by a different version of QuickBooks, you may need to update the company file before you can open it. To do this, go to File > Update Company and follow the instructions.
Condition 2: For Multi-user Conditions Only
In case you using the multi-user mode then refer to the solutions given below:
Step 1: Copying the backup or company file
- Copy the backup file or the company file that you want to update to your local hard drive, such as the C drive.
- Restore the backup file or update the QuickBooks company file.
- Copy the restored or updated file to its original location.
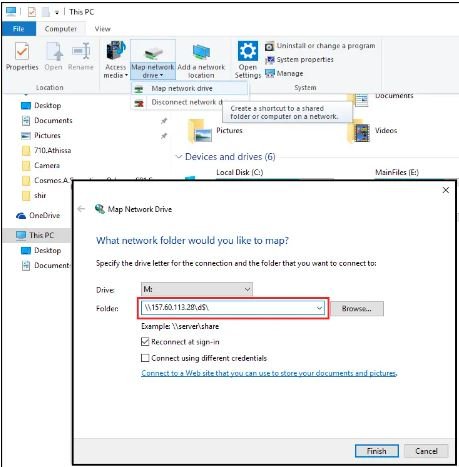
Here are a few additional details about each step:
- You can copy the file by using Windows Explorer or by using a file transfer protocol (FTP) client.
- To restore the backup file, open QuickBooks and go to File > Open or Restore Company. Select Restore Backup and click Next. Browse to the backup file and click OK.
- To update the QuickBooks company file, open QuickBooks and go to File > Update Company. Browse to the updated file and click OK.
- When you copy the file to its original location, make sure that you overwrite the existing file. This will ensure that the updated or restored file is used by QuickBooks.
Step 2: Download and run the QuickBooks File Doctor tool
- Download the QuickBooks File Doctor tool from the Intuit website.
- Run the downloaded file to install the tool.
- If the tool detects data damage but is unable to fix it, you can do one of the following:
- Restore the company file from a recent backup.
- Use the Auto Data Recovery tool to restore the data.
- Send the QuickBooks company file to Intuit’s data recovery team.
- If the tool does not detect any data damage, then there is no issue with the company file.
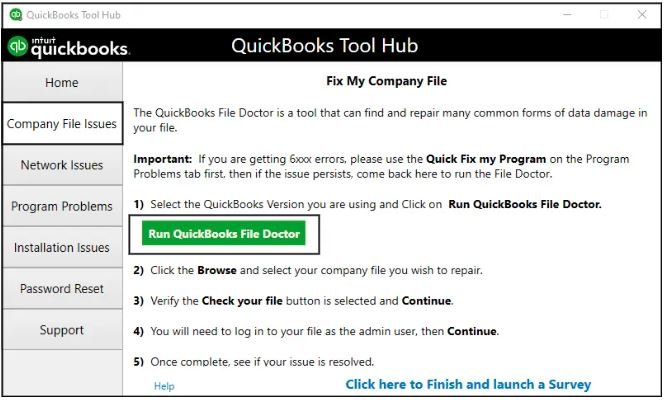
Here are some additional details about each step:
- The QuickBooks File Doctor tool is a free tool that can be used to scan QuickBooks company files for data damage.
- To run the tool, you will need to download the installer file from the Intuit website. Once the file has been downloaded, you can run it to install the tool.
- If the tool detects data damage, it will display a list of the problems that it found. If the tool is unable to fix the data damage, it will not be able to open the company file.
- If you choose to restore the company file from a recent backup, you will need to locate the backup file and then open it in QuickBooks.
- If you choose to use the Auto Data Recovery tool, you will need to run the tool and follow the instructions.
- If you choose to send the QuickBooks company file to Intuit’s data recovery team, you will need to create a support case and then attach the company file to the case.
Step 3: Incorporate QuickBooks Connection Diagnostic Tool
Here are the steps with the QuickBooks Connection Diagnostic Tool incorporated:
- Download the QuickBooks File Doctor tool from the Intuit website.
- Run the downloaded file to install the tool.
- If the tool detects data damage but is unable to fix it, you can do one of the following:
- Restore the company file from a recent backup.
- Use the Auto Data Recovery tool to restore the data.
- Send the QuickBooks company file to Intuit’s data recovery team.
- If the tool does not detect any data damage, then you can use the QuickBooks Connection Diagnostic Tool to troubleshoot connection issues.
- To run the tool, go to File > Utilities > QuickBooks Connection Diagnostic Tool.
- The tool will scan your computer for any problems that could be affecting your connection to QuickBooks.
- If the tool finds any problems, it will display a list of the problems and provide suggestions on how to fix them.
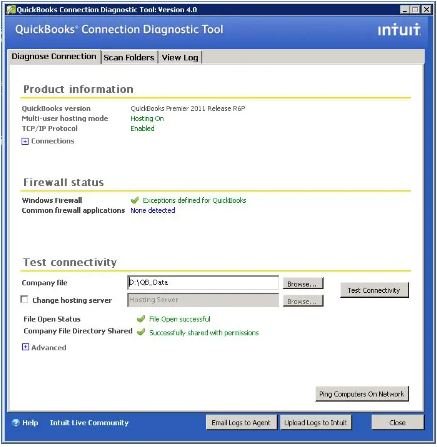
Here are some additional details about the QuickBooks Connection Diagnostic Tool:
- The QuickBooks Connection Diagnostic Tool is a free tool that can be used to troubleshoot connection issues with QuickBooks.
- The tool can scan your computer for a variety of problems, including:
- Firewall settings
- Network configuration
- QuickBooks software
- If the tool finds any problems, it will display a list of the problems and provide suggestions on how to fix them.
Condition 3: Manually Fix the QuickBooks Error 6000 80
This solution is for when online tools such as QuickBooks Connection Diagnostic Tool or QuickBooks File Diagnostic Tool cannot run successfully. Use this solution in those situations.
Step 1: Update the QuickBooks to the latest release
- Proceed to the QuickBooks Download and Update page.
- Select your country, product, and version.
- Click Search to find the latest updates.
- Click Get Updates to download the updates.
- Once the updates are downloaded, install them by following the on-screen instructions.
Automatic updates
- If you have automatic updates enabled, QuickBooks will automatically download and install updates for you.
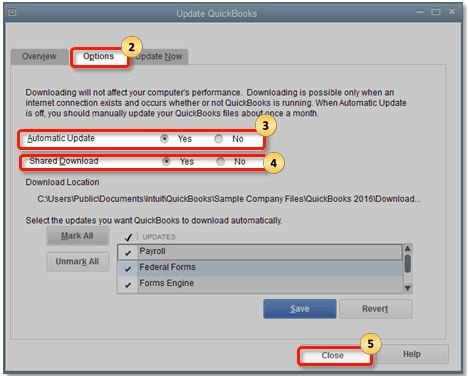
- To check if automatic updates are enabled, go to Help > QuickBooks Preferences > Update QuickBooks Desktop.
- Ensure that the Automatically check for updates checkbox is checked.
Manual updates
- If you have automatic updates disabled, you can manually update QuickBooks by following these steps:
- Close all open QuickBooks company files.
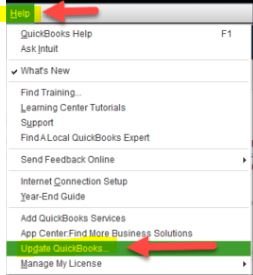
- Go to Help > Update QuickBooks Desktop.
- Click Update Now.
- QuickBooks will check for updates and download them if they are available.
- Once the updates are downloaded, install them by following the on-screen instructions.
If the error code persists
- If you have updated QuickBooks to the latest release but the error code persists, you can try the following steps:
- Restart your computer.
- Uninstall and reinstall QuickBooks.
- Contact QuickBooks support for help.
Here are some additional tips for updating QuickBooks:
- Make sure that you have a backup of your QuickBooks data before you start the update process.
- If you are using a proxy server, you may need to configure QuickBooks to use it for updates.
- If you have any problems updating QuickBooks, you can contact Intuit support for help.
Step 2: Configure the firewall & system security application for the QuickBooks file
Note: Contact your firewall application provider. Intuit does not offer support for firewall issues, so you will need to contact the provider of your firewall application for help troubleshooting the problem.
- Check for firewall and internet security updates. Make sure that your firewall application and internet security software are up to date. Outdated software can sometimes cause problems with QuickBooks.
- Visit the Microsoft website for firewall configuration help. The Microsoft website has a comprehensive guide on how to configure firewalls in Windows.
- If the error persists, contact Intuit support. If you have tried all of the above steps and you are still having problems, you can contact Intuit support for help.
Here are some additional tips for configuring your firewall for QuickBooks:
- Make sure that QuickBooks is allowed through your firewall.
- If you are using a proxy server, you may need to configure your firewall to use it.
- If you are using a VPN, you may need to configure your firewall to allow traffic through the VPN.
Step 3: Verify permissions to access/open the QuickBooks company file
- Navigate to the folder where the QB Company file is stored.
- Right-click the folder and select Properties.
- Click on the Security tab.
- Make sure that the following users have Full Control permissions:
- Everyone
- QBDataServiceUserXX (where XX is the version of QuickBooks you are using)
- If the users do not have Full Control permissions, click on Edit and grant them the appropriate permissions.
- Close the Properties window.
- Try to open the QB Company file again. If you are still having problems, contact Intuit support.
Here are some additional tips for verifying permissions for QuickBooks:
- Ensure that you are logged in as an administrator account.
- If you are using a shared folder, make sure that the users who need access to the QB Company file have the appropriate permissions.
- If you are using a firewall, make sure that QuickBooks is allowed through the firewall.
Step 4: Scan the QuickBooks Company File
The .nd file is a text file that contains information about the QuickBooks company file, such as the file name, the path to the file, and the IP address of the server. The .nd file is used by QuickBooks to connect to the QuickBooks company file.
- Click on the Start button and select Programs > QuickBooks > QuickBooks Database Server Manager.
- In the QuickBooks Database Server Manager window, click on the Add Folder button.
- Navigate to the folder that contains your QuickBooks company files and select it.
- Click on the Scan button.
- The QuickBooks Database Server Manager will scan the folder and create a .nd file for each QuickBooks company file that it finds.
- Close the QuickBooks Database Server Manager window.
Here are the steps on how to verify that the .nd file has been created:
- Navigate to the folder that contains your QuickBooks company files.
- Look for a file with the .nd extension. The .nd file will have the same name as the QuickBooks company file but with the .nd extension added. For example, if your QuickBooks company file is named mycompany.qbw, the .nd file will be named mycompany.qbw.nd.
- If you do not see a file with the .nd extension, then the .nd file has not been created. You can try creating the .nd file again by following the steps above.
Step 5: Open/access the QuickBooks Company file & verify the data damage
There are two steps given below to open or access the QuickBooks company file & verify the data damage:
1: Use the host computer to open/access the QuickBooks file(s)
- Find the system where the QuickBooks Company file is stored.
- If the Server Install is only on the host computer Open QuickBooktry tries to open the company file that is receiving the error message.
- If the company file opens, then check the company file for any errors.
- If the company file does not open, then copy the company file to another location.
- In QuickBooks, go to the File menu and select Rebuild Data.
- Follow the instructions in QuickBooks to rebuild the company file.
- If QuickBooks does not find any errors in the company file, but the error message persists, then copy the company file to another location.
Here are some additional tips for troubleshooting this error message:
- Make sure that you are using the latest version of QuickBooks.
- Make sure that the company file is not corrupted. You can use the QuickBooks File Doctor to check for corruption.
- Make sure that the company file is not in use by another user.
- Ensure the company file is in a network folder accessible to all users who need to open it.
- If you are still having problems, you can contact Intuit support for help.
2: Copy the company file to another location
- Open the folder that contains the QB company file.
- Copy the company file to the desktop.
- Open QuickBooks and try to open the company file from the desktop.
- If the company file opens, then the problem is with the location of the company file.
- Rename the original company file by adding “OLD” or “DAMAGED” to the beginning of the file name.
- Copy the company file from the desktop back to its original location.
- Open QuickBooks and try to open the company file again.
- If the company file still does not open, then the company file is corrupted.
- You can try to repair the company file using the QuickBooks File Doctor.
- If the File Doctor cannot repair the company file, then you can contact Intuit Data Services for help.
Here are some additional tips for troubleshooting this error message:
- Make sure that you are using the latest version of QuickBooks.
- Make sure that the company file is not corrupted. You can use the QuickBooks File Doctor to check for corruption.
- Make sure that the company file is not in use by another user.
- Ensure the company file is in a network folder accessible to all users who need to open it.
- If you are still having problems, you can contact Intuit support for help.
In the End!
If the solutions mentioned above continue the QuickBooks error 6000 80 you can opt for a reliable QuickBooks Support consulting agency. Accountspro is one such company that helps to resolve issues with your accounting software. The expert professionals roofed here are Intuit-certified ProAdvisors who are approachable. They assure complete resolution in a minimum TAT (turn-around time). Dial the 24×7 active toll-free number ☎ 1-800-983-3087 and resolve your issues instantly.
Frequently Asked Questions
What is error code 6000 in QuickBooks?
QuickBooks Error 6000 is a frequently encountered issue by users while attempting to open or access a company file. The error is typically triggered by problems related to the network setup, damaged or corrupt .TLG files, or insufficient file permissions.
What is error code 80 in QuickBooks?
Error 80 Crash is a well-known issue that occurs when an incorrect line of code is compiled into the source code of a program. This error often arises when the product (QuickBooks) or computer cannot handle specific input data, leading to program instability and crashes.
What is error 6000 82 or 6000 106 in QuickBooks?
QuickBooks Error 6000 82 or 6000 106 is an error code that appears when users attempt to open, restore, or back up a QuickBooks company file. Typically, this error indicates an issue with the company file, such as a damaged or incorrect file extension.
What is QuickBooks error 6000 80?
Multiple systems are hosting the company file in the network, leading to an incorrect network setup. As a result, the client’s workstation cannot connect to the server. Furthermore, the company file that you are attempting to open is corrupt.
What is QuickBooks Error 6000 80 and how does it appear?
The mentioned error is a frequent occurrence in QuickBooks Data Files when the software cannot open a company file. Several factors can lead to QuickBooks Error 6000 80, including damaged or corrupt company files, improper file permission settings, or problems with the network connection.


