


QuickBooks Desktop stores every transaction you enter, including invoices, bills, payments, payroll records, and journal entries. As your company file grows, QuickBooks may open more slowly, take longer to back up, or show performance issues.
The QuickBooks Condense Data Utility can help reduce file size by removing audit trail information and, in some cases, summarizing older transactions. However, the amount of file reduction and performance improvement varies depending on your QuickBooks Desktop version, the size of your audit trail, and the overall condition of your company file.
If your company file contains data damage or unresolved transactions, QuickBooks may display errors such as:
- “QuickBooks cannot condense your data.”
- “An error occurred when QuickBooks tried to condense the company file.”
- “Verify Data has found problems with your company file.”
In this guide, we’ll discuss what the QuickBooks Condense Repair Tool is, when it does not remove certain transactions, how to condense a QuickBooks Desktop data file, and how to troubleshoot common condense errors.
What is the QuickBooks Condense Data Utility Tool?
QuickBooks does not include a standalone utility called the “QuickBooks Condense Repair Tool.” Instead, Intuit provides several built-in tools that help resolve issues that prevent the Condense Data Utility from completing successfully. These tools include:
- Condense Data Utility: Reduces company file size by removing audit trail information and, depending on your settings and QuickBooks version, summarizing or deleting older transactions.
- Verify Data: Scans your company file for data integrity issues.
- Rebuild Data: Repairs issues detected by Verify Data.
If QuickBooks detects damaged data, broken transaction links, or list corruption, you should run Verify Data and Rebuild Data before attempting to condense your file.
When the QuickBooks Condense Repair Tool Doesn’t Remove Certain Transactions?
The Condense Data Utility does not delete every transaction before the cutoff date. QuickBooks retains some entries to preserve account balances, tax information, and transaction links.
| Transaction Type | Why QuickBooks Does Not Remove It |
|---|---|
| Payroll Transactions | Preserves employee history, tax filings, payroll liabilities, and compliance-related records |
| Invoices, Payments, Credit Memos, and Refund Checks | Transactions are not properly linked |
| Payments Recorded to Undeposited Funds | Payments have not been included in a deposit |
| Bills, Bill Credits, and Bill Payment Checks | Related transactions are not correctly connected |
| Estimates Linked to Invoices | Estimates are non-posting transactions |
| Transactions Linked to Non-Condensable Entries | Required to preserve transaction integrity |
| Sales Tax Transactions | Sales tax was paid using a regular check instead of the Pay Sales Tax feature |
Important Warning Before You Condense Your Data
The Condense Data Utility permanently changes your company file. You cannot undo the process unless you restore a backup created before condensing.
- Always create and verify a complete backup before you begin.
- Switch QuickBooks to Single-user Mode.
- Create a verified backup of your company file.
- Save key financial reports as PDF files.
- Temporarily remove the closing date.
- Run Verify Data and Rebuild Data.
- Confirm that no other users are accessing the file.
What are the Steps to Use the Condense Repair Utility?
If the Condense Data Utility fails due to file damage or data issues, you can use the QuickBooks Condense Repair Utility to fix the problem and continue the process. Here are the steps to use the QuickBooks Condense Repair Utility:
Step 1: Run Verify Data
- Open QuickBooks Desktop.
- Go to File > Utilities > Verify Data.
- Wait for QuickBooks to scan the file.
- Review any errors that appear.
Step 2: Run Rebuild Data
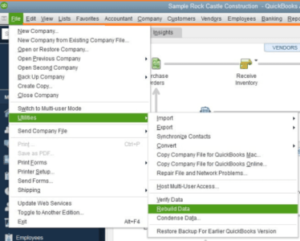
- Go to File > Utilities > Rebuild Data.
- Create a backup when prompted.
- Let QuickBooks repair the file.
- Run Verify Data again to confirm no issues remain.
Step 3: Run the Condense Data Utility Again
- Go to File > Utilities > Condense Data.
- Follow the on-screen wizard.
- Review the Condense Report after completion.
What are the Steps to Condense a QuickBooks File in the Desktop Application
Before you run the QuickBooks Condense Data Utility, review your company file and save any important reports. Follow the steps below to condense your QuickBooks Desktop company file safely.
Step 1: Identify Transactions That QuickBooks Cannot Condense
Some transactions cannot be removed because they are linked to open balances, payroll records, or tax entries. Here are the steps to condense and remove old data in QuickBooks.
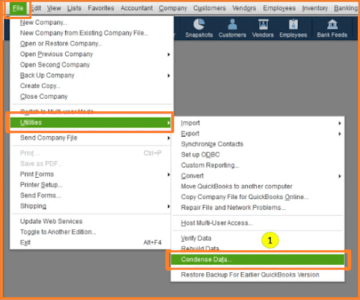
- Open QuickBooks Desktop.
- Go to File > Utilities > Condense Data.
- Select Transactions before a specific date.
- Enter the cutoff date.
- Click Next.
- Choose how QuickBooks should summarize transactions.
- Review the summary.
- Save a backup when prompted.
Step 2: Prepare Your Company File
Preparing the company file reduces the chances of errors during the condense process. It also ensures that your financial reports remain accurate after QuickBooks removes old data. Here are the steps to prepare your company file:
- Remove the closing date temporarily.
- Go to Edit > Preferences > Accounting > Company Preferences.
- Clear the date in the Closing Date field.
- Click OK.
- Run the following reports:
- Profit and Loss
- Balance Sheet
- Re-sort all lists.
- Run Verify Data and Rebuild Data.
- Confirm that QuickBooks reports no data damage.
- Create a complete backup of your company file.
Step 3: Save Comparison Reports
Saving key reports before you begin allows you to compare balances after the process and verify that your financial data remains accurate. Here are the reports you should save as PDF files:
- Accrual-based Profit and Loss (All Dates)
- Accrual-based Balance Sheet (All Dates)
- Statement of Cash Flows
- Accounts Receivable Aging
- Accounts Payable Aging
- Any additional reports your accountant needs
Step 4: Run the Condense Data Utility
Once you finish the preparation steps, you can start the condensation process. Depending on the size of your company file, QuickBooks may take several minutes or several hours to complete the operation. Here are the steps to condense your QuickBooks Desktop company file:
- Open QuickBooks Desktop.
- Go to File > Utilities > Condense Data.
- Follow the on-screen wizard.
- Select the condensed options that best fit your needs.
- Click Help if you need more information about any option.
- Click Start Condense.
- Wait for QuickBooks to complete the process.
- Review the Condense Report after completion.
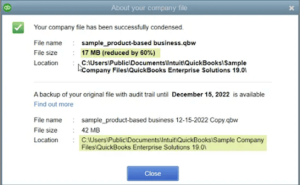
Tip: Run the Condense Data Utility directly on the host computer that stores the company file.
What are the Steps to Condense Your QuickBooks Desktop for Mac Company File?
If you use QuickBooks Desktop for Mac, you can condense your company file to reduce its size and remove old transactions. QuickBooks for Mac offers several condensed options, depending on how much data you want to remove.
For QuickBooks Mac Plus 2023
QuickBooks Mac Plus 2023 gives you multiple ways to reduce file size while keeping the data you still need.
Remember that Menu paths and available condensed options may vary slightly depending on your version of QuickBooks Desktop for Mac.
Option 1: Remove Audit Trail
This option deletes the audit trail history but keeps all your transactions. It is a good choice if you want to reduce file size without removing accounting data. Here are the steps to remove the audit trail:
- Open QuickBooks Desktop for Mac.
- Go to File > Utilities > Condense Data.
- Select Remove Audit Trail info to date.
- Click Condense.
- Save a backup when prompted.
- Review the Condense Data Completed screen.
Option 2: Remove All Transactions
This option deletes every transaction in the company file but keeps your lists, preferences, and templates. Here are the steps to remove all transactions:
- Go to File > Utilities > Condense Data.
- Select Remove All Transactions.
- Confirm that QuickBooks will keep your preferences and lists.
- Click Condense.
- Create a backup.
- Review the completion summary.
Option 3: Remove Transactions Before a Specific Date
This option removes transactions dated before the cutoff date you select. It is the most commonly used condensed option. Here are the steps to remove transactions before a specific date:
- Go to File > Utilities > Condense Data.
- Select Remove Transactions Dated.
- Choose Before and enter the cutoff date.
- Click More Options.
- Select the settings you want.
- Click Condense.
- Save a backup.
- Review the Condense Data Completed screen.
Option 4: Create a Period Copy
A period copy creates a condensed company file that contains data only for a selected date range. Here are the steps to create a period copy:
- Go to File > Utilities > Condense Data.
- Select Remove Transactions Dated.
- Choose Before and After.
- Enter the start and end dates.
- Click More Options and select your preferences.
- Save a backup.
- Review the completion report.
Note: Some cash-basis calculations, linked transaction relationships, and historical reporting details may differ from the original company file.
Additional Options When You Choose “Remove Transactions Dated”
When you select Remove Transactions Dated, QuickBooks asks how you want to handle certain data during the condense process.
Remove Specific Transactions
- Transactions marked To Be Printed
- Sales orders
- Pending invoices
- Estimates
- Purchase orders
- Unbilled expenses
- Uncleared bank and credit card transactions
- Transactions marked To Be Sent
- Mileage and time activities
Inventory Options
- Keep detailed inventory transactions
- Summarize inventory activity
Summary Options
- Create one summary journal entry
- Create one summary journal entry for each month
Remove Unused List Entries
- Accounts
- Customers and Jobs
- Vendors
- Items
- Classes
- Other Names
- Completed To-Do notes
For QuickBooks Mac Plus 2024 and Earlier
In earlier versions of QuickBooks for Mac, always use a simpler, condensed process.
Steps to Condense QuickBooks Desktop for Mac 2024 and Earlier
This version removes transactions before a date you specify. Here are the steps to condense your file:
- Open QuickBooks Desktop for Mac.
- Go to File > Utilities > Condense Data.
- Enter the cutoff date.
- Click OK.
- Create a backup file.
- Click OK after the backup completes.
- Review the Condense Data Completed screen.
- If some transactions were not removed, click Show List to view them.
Troubleshooting Errors While Using the QuickBooks Condense Repair Tool
If the Condense Data Utility fails and shows errors such as “QuickBooks cannot condense your data” or “An error occurred when QuickBooks tried to condense the company file,” you can restore a backup or create a new company file to resolve the issue.
1. Restore a Backup of Your Company File
If your current company file is damaged, restoring a backup can help you return to a working version of the file.
Important: If your backup file (.QBB) is stored on a USB drive or network location, copy it to your local computer before restoring it.
Steps to Restore a Backup
- Open QuickBooks Desktop.
- Go to File > Open or Restore Company.
- Select Restore a backup copy and click Next.
- Choose Local Backup and click Next.
- Browse to your .QBB backup file.
- Select a folder where you want to save the restored company file.
- Click Open, then select Save.
- If QuickBooks asks whether to overwrite an existing file, choose the option that fits your needs.
Note: If the backup file is stored on a USB drive or network location, copy it to your local computer before restoring.
2. Create a New Company File
If restoring a backup does not solve the problem, create a new company file and enter your business information again.
Steps to Create a New Company File
- Open QuickBooks Desktop.
- In the No Company Open window, click Create a New Company.
- Choose one of the setup options:
- Express Start / Start Setup to create the file quickly with basic details.
- Detailed Start to enter more complete business information.
- Follow the on-screen instructions.
- Click Start Working when QuickBooks finishes creating the file.
Benefits of the QuickBooks Condense Data Utility
The Condense Data Utility reduces file size and helps you manage your QuickBooks company file more efficiently.
- Reduces company file size by removing unnecessary historical and audit trail data.
- Removes audit trail information while preserving your accounting transactions.
- Improves backup times by decreasing the overall size of the company file.
- Simplifies historical data by summarizing older transactions into journal entries.
- May improve QuickBooks performance, depending on your file condition and version.
Note: Results vary depending on your QuickBooks version, company file condition, and the size of your audit trail.
Conclusion
The QuickBooks Condense Data Utility helps reduce file size and manage older accounting data. In newer versions of QuickBooks Desktop, the process may primarily remove audit trail information rather than significantly reducing transaction detail.
To condense your file safely, switch to Single-user Mode, create a verified backup, run Verify Data and Rebuild Data, and save key financial reports for comparison. If errors occur, use QuickBooks data repair utilities to resolve the issue before trying again.
Frequently Asked Questions
How do I know if my QuickBooks company file needs to be condensed?
If QuickBooks opens slowly, backups take longer than usual, or reports run sluggishly, condensing may help reduce file size.
Will condensing QuickBooks affect my accountant’s copy?
Yes. Condensing can remove transaction detail and create summary entries. Share a backup of the original file with your accountant before proceeding.
Can I condense only one fiscal year?
Yes. You can specify a cutoff date and remove transactions before that date.
Does the Condense Data Utility remove attachments and templates?
No. QuickBooks generally retains attached documents, templates, and list information.
Should I verify reports after condensing?
Yes. Compare your Profit and Loss, Balance Sheet, and other reports before and after condensing to confirm that balances remain unchanged.